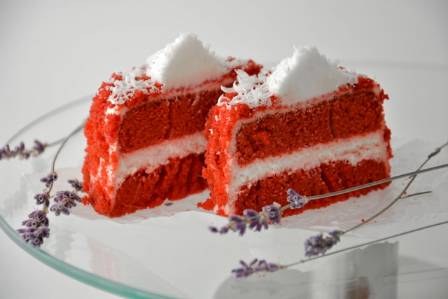
This signature red velvet cake is a beloved family tradition, celebrated for its incredibly soft, moist, and tender crumb. Originally a "special occasion" masterpiece served during the holidays, this recipe has been refined to ensure a perfect result every time. Whether you are preparing it for a festive Christmas gathering, a romantic Valentine’s Day dinner, or simply to satisfy a craving for a rich, velvety dessert, this cake consistently delivers a high-quality experience.
The Essence of Red Velvet
Red velvet is often misunderstood as merely a chocolate cake dyed red. In reality, a proper red velvet cake relies on a specific chemical reaction to achieve its famous "velvety" texture. The combination of buttermilk and a small amount of vinegar creates an exceptionally tender crumb. While cocoa powder is included, it is used in a small quantity to provide a subtle depth rather than a dominant chocolate flavor. The result is a sweet, slightly tangy vanilla-buttermilk profile with just a hint of cocoa.
This recipe uses oil instead of butter, which is the secret to its light, fluffy consistency and long-lasting moisture. When paired with the right frosting, every bite offers a harmonious balance of silkiness and flavor.

Essential Ingredients
The beauty of this recipe lies in its use of standard pantry staples. To achieve the perfect cake, you will need:
-
Vegetable Oil: Ensures the cake remains moist and the crumb stays tender.
-
Large Eggs: Act as a binding agent and provide additional moisture.
-
Buttermilk and Vinegar: This duo is essential for the cake's signature tang and tender texture.
-
Vanilla Extract: Enhances the overall flavor profile.
-
Granulated Sugar: Provides the necessary sweetness.
-
Unsweetened Cocoa Powder: Adds a delicate hint of chocolate and reacts with the acid to deepen the color.
-
Baking Soda and Salt: Essential for lift and flavor balance.
-
All-Purpose Flour: Creates the structure of the cake.
-
Red Food Coloring: Achieves the iconic, vibrant crimson hue.
Preparation and Baking Steps
Following these steps will yield a professional-grade cake in very little time. Preparation takes approximately 10 minutes, with a baking time of about 30 minutes.
First, preheat your oven to 350°F. Prepare three 8-inch round pans by coating them with nonstick spray and lining the bottoms with parchment paper for easy removal. In a stand mixer, combine the oil, eggs, buttermilk, vinegar, and vanilla. Once smooth, incorporate the sugar.
Next, add the cocoa powder, salt, and baking soda, mixing until no lumps remain. Gradually stir in the flour and red food coloring on low speed until the batter is smooth. Divide the mixture evenly among your prepared pans. Bake for 25 to 30 minutes, or until a toothpick inserted into the center comes out clean. Allow the cakes to cool in the pans for 10 minutes before transferring them to a wire rack to cool completely. If the layers have domed during baking, trim them with a serrated knife so they stack evenly.
Choosing the Perfect Frosting
While cream cheese frosting is the most common modern pairing for red velvet, many traditionalists prefer "heritage frosting" (also known as cooked flour frosting). This southern classic offers a unique, silky texture that complements the cake's tanginess perfectly. Other excellent options include a traditional vanilla buttercream for those who prefer a simpler sweetness, or even a rich chocolate frosting for a more decadent twist.
Storage and Freezing Instructions
To maintain its freshness, store the cake in an airtight container in the refrigerator for up to five days. For the best texture, allow the cake to sit at room temperature for a short period before serving.
If you wish to prepare the cake in advance, it freezes exceptionally well. You can freeze the entire cake or individual slices for two to three months. To serve, thaw the cake overnight in the refrigerator and bring it to room temperature before enjoying.